VPS sing-box Deployment Tutorial
This tutorial walks you through deploying sing-box on a VPS in the actual operation order, covering server info, port mapping, SSH access, one-click installation, and routine maintenance.
The only assumption is that you already have a VPS you can log in to and know its public access details. Provider selection and plan comparisons are outside the scope.
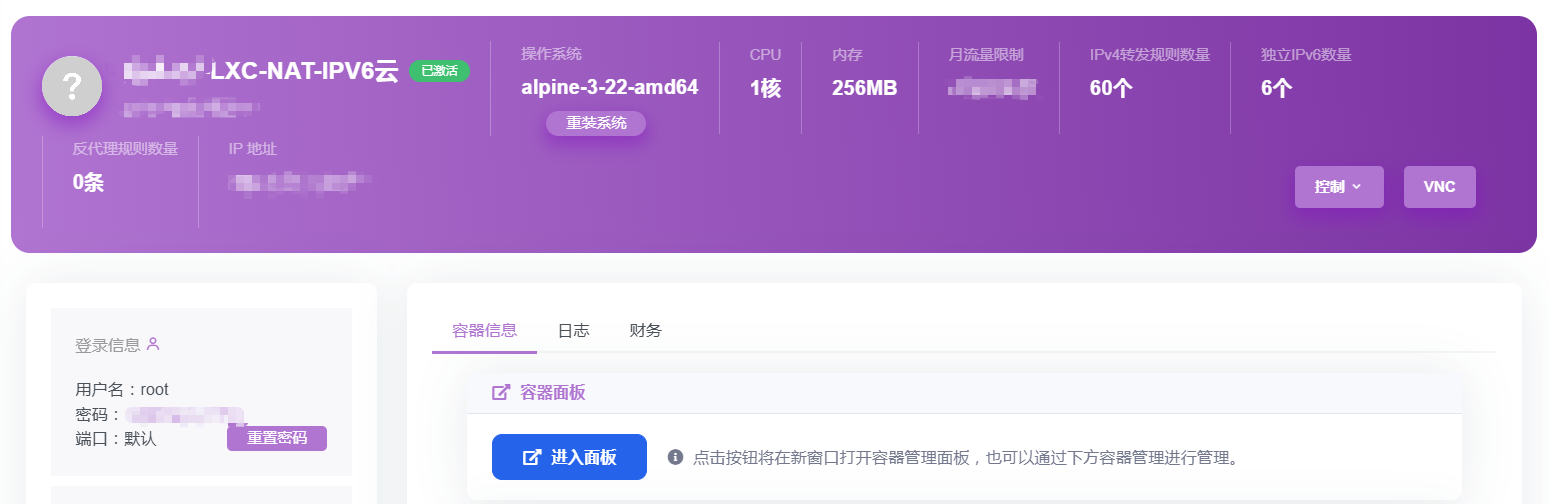
1. Gather Server Info
Before connecting, make sure these three items are clear. You will use them again during SSH login, script setup, and client import:
- Public IP
- Login username (usually
rootor a panel-assigned user) - Login password (some panels send this by email)
2. Port Mapping
If your provider only exposes a limited set of public ports, you need to handle this step first. If you already have a full public VPS, the same idea usually maps to opening ports in your firewall or security group.
Panel labels differ across providers, but the underlying logic is the same: bind a public-facing port to the actual port used inside the instance.
Map two ports:
- One unused public port -> internal
22for SSH, for example21231 -> 22 - Another public port -> the same internal port for the service itself, for example
41231 -> 41231
| Purpose | Public Port (example) | Internal Port | Protocol |
|---|---|---|---|
| SSH | 21231 |
22 |
TCP |
| Service | 41231 |
41231 |
TCP |
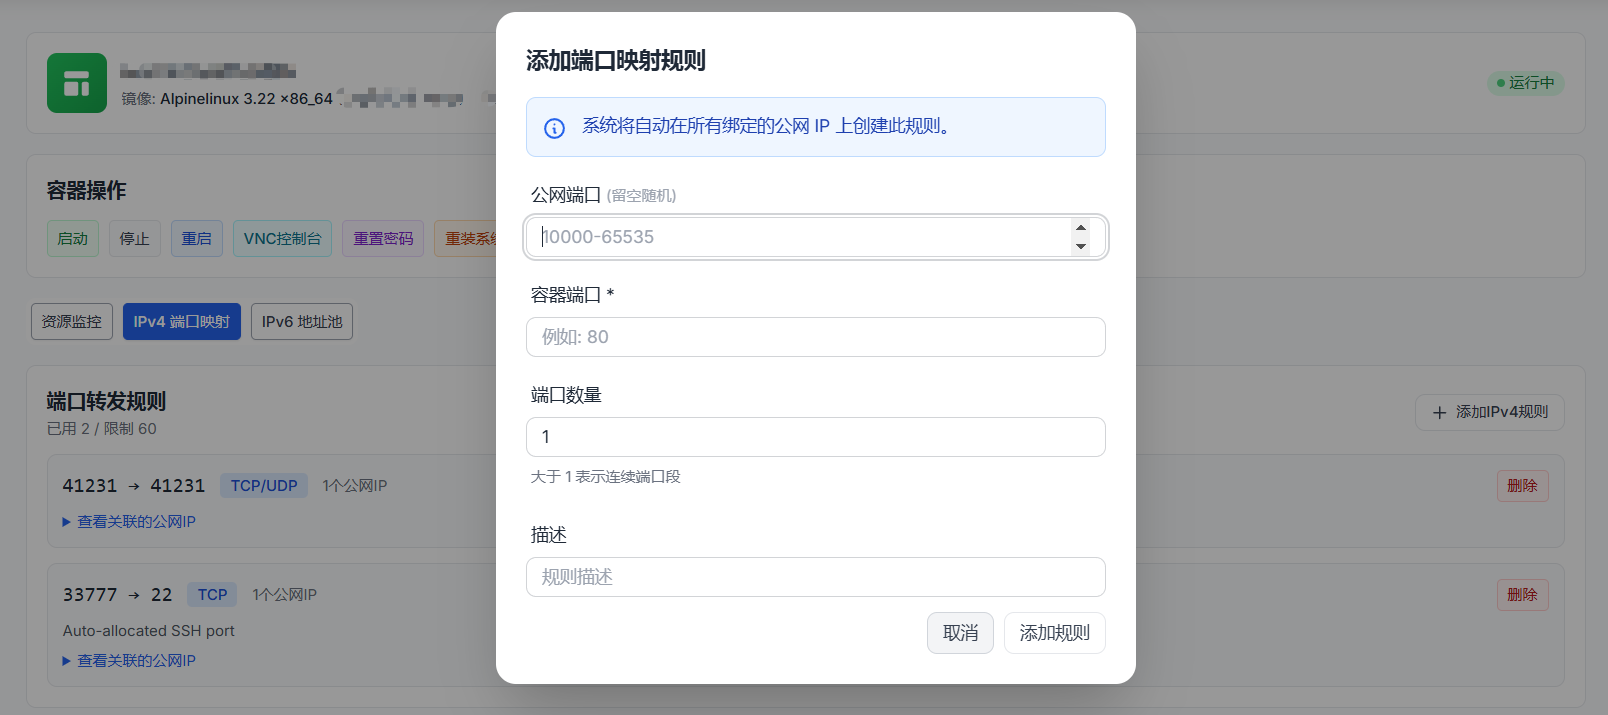
Steps:
- Log in to the server control panel and find IPv4 Port Mapping (some panels label it “Port Forwarding” or “Public Port Mapping”).
- Add the first rule for SSH:
- Public port: any unused public port, for example
21231 - Internal port:
22 - Protocol:
TCP
- Public port: any unused public port, for example
- Add the second rule for the service:
- Public port: for example
41231 - Internal port: also
41231 - Protocol: usually
TCP
- Public port: for example
- Keeping the second port the same on both sides makes later verification, client import, and troubleshooting much easier.
If this step is wrong, the most common results are simple: SSH fails, or the service installs successfully but clients still cannot connect.
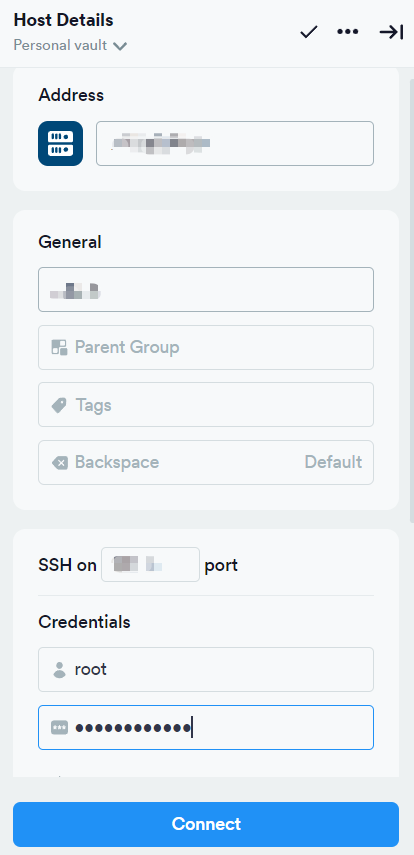
3. Connect via SSH
Open an SSH client (Xshell, FinalShell, Termius, etc.) and fill in:
- Host: the server’s public IP; if your provider also gives you a usable domain, that works too
- Port: the mapped SSH port (e.g.
21231, not the default22) - Username / Password: credentials from the control panel
Once connected you are in the Linux terminal. On first login, it is a good idea to run passwd and replace the initial control-panel password with your own.
If SSH does not connect, check three things first: the public IP, the mapped SSH port, and whether the panel-side port rule has actually been saved and applied.
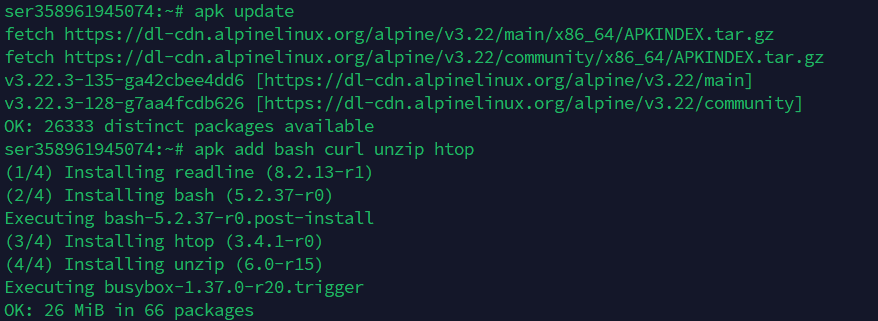
4. Install Basic Tools
curl: downloads the installation scriptunzip: useful when you later unpack archives or backupshtop: a color process monitor that makes CPU and memory usage much easier to read
If the system says sudo is unavailable and you are already logged in as root, remove sudo and run the command again.
Debian / Ubuntu
sudo apt update && sudo apt install -y curl unzip htop
Alpine
apk update && apk add --no-cache curl unzip htop
htopgives you a color process monitor. When the service looks unhealthy, the machine feels slow, or you need a quick resource check, this is usually the first place to look.
5. Install & Configure sing-box
On a resource-constrained VPS, sing-box is usually a practical option because it stays relatively lightweight and easy to manage. The one-click script below handles the base installation and configuration:
Script source: caigouzi121380/singbox-deploy. The repository states that it supports common systems such as Alpine, Debian, and Ubuntu, and can automatically generate configuration, keys, and management commands.
bash -c "$(curl -fsSL https://raw.githubusercontent.com/caigouzi121380/singbox-deploy/main/install-singbox-yyds.sh)"
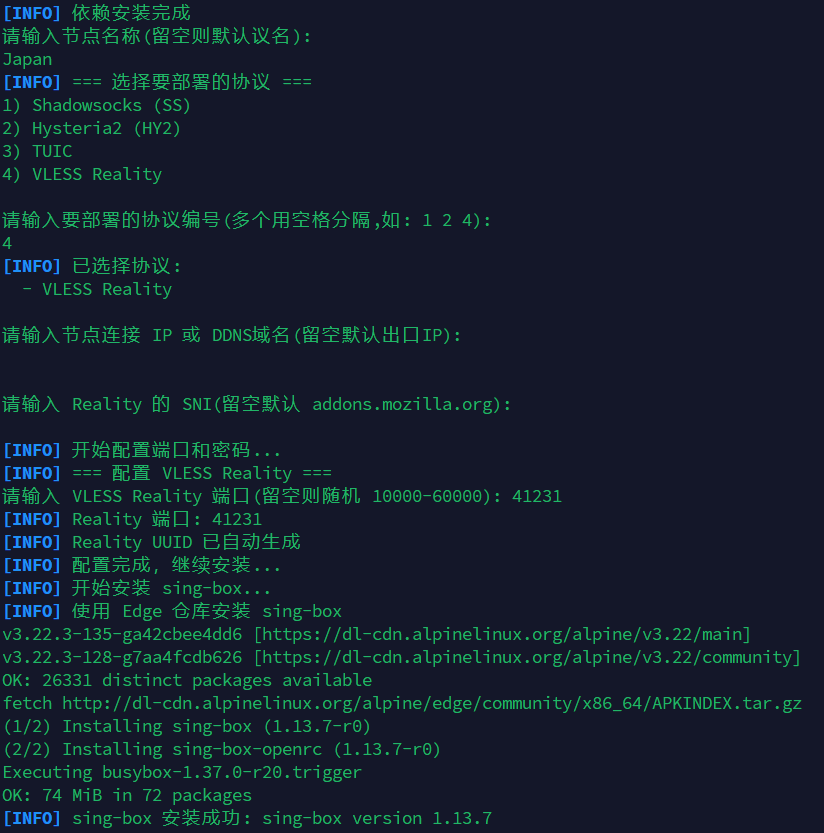
Script prompts:
- Name: use anything convenient such as
my-vpsorhome. It mainly helps you recognize the profile later in the client. If you do not care, just press Enter to skip it. - Protocol: enter
4to follow the setup used in this article. On a first deployment, it is better to keep the setup to a single option and confirm connectivity first.- If the script accepts multiple values such as
2 4, save that for later. On a modest VPS, enabling too many options at once usually adds noise without helping the first deployment.
- If the script accepts multiple values such as
- IP/domain: in most cases you can press Enter and let the script detect the public IP automatically. Enter it manually only if the detected result looks wrong or does not match the public entry shown in your control panel.
- Handshake domain (SNI): if you do not have a specific reason to customize it, pressing Enter for the default value is usually fine. Common defaults such as
addons.mozilla.orgare typically sufficient for this step. - Port: enter the public service port exposed by your control panel, for example
41231.- This must match the actual public-facing port exactly. If the panel exposes
41231, the script also needs41231; otherwise the service may install correctly while clients still fail to connect.
- This must match the actual public-facing port exactly. If the panel exposes
The script generates the required UUID, private key, public key, short ID, and related values automatically, then writes them into the service configuration.
Before closing the terminal, do two quick checks first:
- Scan the script output once and make sure there is no obvious error.
- Save the generated connection details somewhere accessible. You will need them again for import, client migration, or troubleshooting.
If your system uses systemd, running systemctl status sing-box here is a quick way to confirm that the service actually came up.
Optional: IPv6 Priority Outbound
If your VPS supports IPv6 and you want to prioritize IPv6 for outbound connections, you can modify the configuration. This sets up “IPv4 inbound + IPv6 priority outbound”.
Method 1: One-Command Configuration
CFG=$(for P in $(pidof sing-box 2>/dev/null); do tr '\0' ' ' </proc/$P/cmdline; echo; done | awk '{for(i=1;i<NF;i++) if($i=="-c"){print $(i+1); exit}}'); CFG=${CFG:-/etc/sing-box/config.json}; export CFG; cp "$CFG" "$CFG.bak.$(date +%Y%m%d-%H%M%S)" && python3 - <<'PY'
import json, os, pathlib, sys
p = pathlib.Path(os.environ['CFG'])
c = json.loads(p.read_text())
dns = c.setdefault('dns', {})
servers = dns.setdefault('servers', [])
if not any(isinstance(s, dict) and s.get('tag') == 'local' for s in servers):
    servers.append({'type': 'local', 'tag': 'local'})
changed = False
for o in c.get('outbounds', []):
    if o.get('type') == 'direct' or o.get('tag') in ('direct', 'direct-out'):
        o['domain_resolver'] = {'server': 'local', 'strategy': 'prefer_ipv6'}
        changed = True
if not changed:
    sys.exit('Direct outbound not found, use Method 2 for manual configuration')
p.write_text(json.dumps(c, ensure_ascii=False, indent=2) + '\n')
PY
sing-box check -c "$CFG" && /etc/init.d/sing-box restart
If you see python3: not found, use Method 2 for manual editing.
Method 2: Manual Configuration
First, locate and backup the configuration:
CFG=$(for P in $(pidof sing-box 2>/dev/null); do tr '\0' ' ' </proc/$P/cmdline; echo; done | awk '{for(i=1;i<NF;i++) if($i=="-c"){print $(i+1); exit}}'); CFG=${CFG:-/etc/sing-box/config.json}; cp "$CFG" "$CFG.bak.$(date +%Y%m%d-%H%M%S)"; echo "$CFG"
Edit the configuration file (using vi or another editor):
- Add the
dnsconfiguration at the top level (if not already present):
"dns": {
  "servers": [
    { "type": "local", "tag": "local" }
  ]
},
- In the
outboundssection, find the entry with"type": "direct"and add this line:
"domain_resolver": { "server": "local", "strategy": "prefer_ipv6" }
Save, then check and restart:
sing-box check -c "$CFG" && /etc/init.d/sing-box restart
Verify Configuration
CFG=$(for P in $(pidof sing-box 2>/dev/null); do tr '\0' ' ' </proc/$P/cmdline; echo; done | awk '{for(i=1;i<NF;i++) if($i=="-c"){print $(i+1); exit}}'); CFG=${CFG:-/etc/sing-box/config.json}; curl -6 -s --max-time 8 https://ifconfig.co/ip; grep -nE 'prefer_ipv6|domain_resolver|"dns"' "$CFG"; sing-box check -c "$CFG"
Rollback
Only run this if the configuration breaks or the service stops working after restart:
CFG=$(for P in $(pidof sing-box 2>/dev/null); do tr '\0' ' ' </proc/$P/cmdline; echo; done | awk '{for(i=1;i<NF;i++) if($i=="-c"){print $(i+1); exit}}'); CFG=${CFG:-/etc/sing-box/config.json}; ls -t "$CFG".bak.* | head -n1 | xargs -I{} sh -c 'cp "{}" "$1" && sing-box check -c "$1" && /etc/init.d/sing-box restart' sh "$CFG"
6. Import the Configuration
After the script finishes, the terminal prints an importable connection string that looks roughly like this:
vless://xxxxxxxx-xxxx-xxxx-xxxx-xxxxxxxxxxxx@<IP>:41231?security=reality&sni=addons.mozilla.org&fp=chrome&pbk=...&sid=xx&type=tcp&flow=xtls-rprx-vision#profile-name
Copy the full string into your client (NekoBox, v2rayN, sing-box app, etc.).
If your client supports direct link import, pasting once is usually enough. If you need to enter values manually, match them field by field against the list below.
Quick Parameter Guide
<IP>: your server’s public IP, or a domain name if you entered one manually:41231: the actual public port the client connects to; it must match the port exposed in the control panelsni=addons.mozilla.org: the domain parameter used during the handshake, corresponding to the SNI value chosen earlierfp=chrome: the client fingerprint parameter, commonly set to mimic Chromepbk=...: the public-key parameter used to verify the server sidesid=xx: the short ID, corresponding to the server-sideshort_idflow=xtls-rprx-vision: a transport-related parameter that clients usually import automatically
For normal usage you usually do not need to edit these fields by hand. They matter when you build a manual profile, troubleshoot import failures, or migrate to a different client.
7. Maintenance
Check / restart the service
systemctl status sing-box
systemctl restart sing-box
The script also installs a sb shortcut command for quick management.
If you are on Debian / Ubuntu, you will usually use systemctl. If you are on Alpine, the underlying service manager may be OpenRC instead. In practice, the easiest option is usually to start with the script-provided sb command.
Connection troubleshooting
- SSH in and run
htopto confirm the sing-box process is running. - If it is not, restart the service.
- If the process is running but clients still fail, go back and verify the public port, the panel-side mapping, and the local firewall.
- Some providers occasionally reassign the VPS public IP. If that happens, update the server address in your client.
8. Reference Links
- Original article: https://lucklog.cc/archives/5zS9qks7
- One-click deployment script repository: https://github.com/caigouzi121380/singbox-deploy
- Other useful repository (sing-box-yg): https://github.com/yonggekkk/sing-box-yg
- Official sing-box connection configuration documentation: https://sing-box.sagernet.org/configuration/outbound/vless/
- Official sing-box TLS field documentation: https://sing-box.sagernet.org/configuration/shared/tls/#reality-fields